ZFS is one of those technologies that I have always had on my to-learn list. After I left Sun Microsystems in 2002, there was not much reason to go back to Solaris. I still had my Sun hardware for learning and experimentation. Soon after I started at Purdue University, I gave away and sold all of that gear to students that were interested in learning Sun hardware and Solaris.
When ZFS became available in OpenSolaris and Solaris 10 (update 6/06) in 2005 and 2006, respectively, I was no longer using Solaris or administering any Solaris systems. (If anything, I was complaining about the Solaris systems that I had to use.) As ZFS was integrated into FreeBSD, it became more interesting. I did not have any hardware that would be a good place to play and learn though.
Fast forward to the end of 2014, we now have access to a lot of retired server gear with plenty of disks, RAID cards, a lot of CPU and memory in the data center at work. So, I divided up the equipment with my security engineers as systems with which to learn and experiment. One of the first things I thought our group could use was a file server for desktop backups and general storage. Being a FreeBSD guy, my first thought was FreeNAS. After installing FreeNAS 9.3 and discovering that it was all ZFS now, I realized that now was the time to learn how to make ZFS go.
My initial research lead me to a great (but slightly old) presentation by Ben Rockwood called Becoming a ZFS Ninja (videos part 1 and 2). My eye-opening moment was when Ben talked about experimentation using VirtualBox and creating virtual disks to manage under ZFS. Well, of course. That seems obvious now!
I want to learn ZFS and play around in a safe environment. VirtualBox (or any other virtualization toolset) is a great way to do that. Sure, I have hardware now, but a virtualized environment to play with the configuration makes more sense. I expect to do stupid stuff in ZFS (some intentionally). What I need is an environment that is tolerant of mistakes and provides a easy way to go back and try something different. I cannot be driving over to the data center every time I mess up the base OS and have to reinstall again.
So, I built a safe place in which I can run around with scissors, bonk my head on the equipment, and jump off the swing set at the highest point. Nothing can hurt me because I can reset and try again. It is a safe playground for learning.
This post is really for me, but hopefully you can find something useful here as well.
Equipment List
We need to assemble our equipment and tools to build our playground. Here is a list of what my playground has. (You can build yours with similar equipment.)
- VirtualBox
- Virtual disks
- FreeBSD 10.1
That’s a very simple list. Feel free to deviate from it. For example, your playground may work equally well with other virtualization tools. I have access to VMWare Workstation at the office, but I never use it. VirtualBox is free to use and is actively supported. I chose FreeBSD 10.1 because it’s the new shiny FreeBSD release as of this writing. It also has ZFS baked into the OS. The BSD installer can also create a ZFS root partition, which I plan to experiment with as well.
You could use a different virtualization platform. In fact, I would interested in hearing about the use of other tools. Leave a comment.
You could use a different operating system. FreeBSD is something with which I am very familiar. There are ZFS implementations in several other operating systems. Pick your favorite. From what I can tell, most of the management of ZFS is handled using the zfs and zpool commands, which are similar in most implementations.
Caveats
The purpose of the playground is to learn the concepts in ZFS, play with the commands, and learn from mistakes. The playground is small though. We cannot build a large storage service with specific performance targets in the playground. Some features of ZFS cannot be enabled and used effectively given limitations of the playground (disks and memory mostly). We are also not attempting to build a file server with lots of file sharing services, like FreeNAS.
We can, however, build a reasonably good place to blow stuff up, get concussions, destroy data, and wreak havoc without anyone or anything being permanently harmed or any smoking hardware. We simply reset the VM back to a snapshot, and we are back in business.
ZFS Playground Construction
The first thing that we need to do is to assemble our tools. If you don’t have your virtualization tools ready, go ahead and get those downloaded and installed. You can find VirtualBox at the virtualbox.org site, and it is available for Windows, Mac OS X, and Linux.
For the operating system, download the OS installer ISO image. For FreeBSD, download the amd64 (64-bit) ISO image (download). There are now many more options for installing 10.1, but this is all you need.
Creating a New OS Virtual Machine
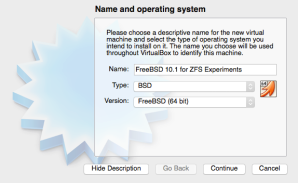
Configure your virtualization tool to create a new virtual machine (VM) for the ZFS-enabled operating system. Here are the VM specifications that I use:
- 64-bit operating system
- four GB memory (ZFS loves memory, but four will get us started.)
- two or four CPUs (I cap execution at 75% to prevent the VM from affecting the host.)
- one main OS disk sufficient in size to hold the OS files
- one CD drive for the OS installation ISO image
- one network interface for updates (optional)
- no audio or USB support (We don’t need them.)

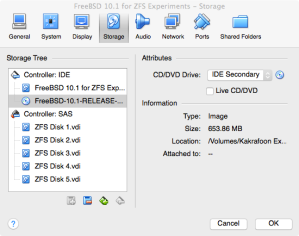
While you are configuring the VM, you can also create a series of virtual disks for ZFS to manage. The flexibility of ZFS allows it to work with a variety of disks. For simplicity at this stage, I would recommend creating at least three virtual disks. Here is what I created:
- a new SAS controller (implemented as a LSI Logic device in VirtualBox)
- five, two GB fixed-size virtual SAS disks (named “ZFS Disk x”)

The fixed size disks have their space allocated at creation, instead of growing the disk as it is used. The small size of the disks is not important and has no impact on ZFS for our purposes.
Assign the OS installation ISO image to the virtual CD drive and start the installation. For FreeBSD 10.1, you have the option to install the operating system on a root file system that is managed by ZFS. That’s great for future experimentation. To avoid confusion at this stage, let’s do the usual UFS installation. We may revisit FreeBSD on a ZFS root later.
The installation of FreeBSD 10.1 is left as an exercise for the reader. If you encounter issues though, let me know.
Check Out the OS
Once you have the OS installed, detach the installation ISO and reboot.
From here, I will be referring to FreeBSD 10.1 specifically.
The first thing we should do is check for updates and apply those. There may be updates that apply to ZFS, so let’s avoid potential issues by having the latest version available. Run the following command to download and install any FreeBSD updates.
FreeBSD out of the box has enough tools installed to make most admins happy. If you need more, fire up pkg and install what you need. (This is also left as an exercise for the reader.) I would not waste too much time making this particular FreeBSD VM the ultimate admin world for you. We are here to learn ZFS, not FreeBSD specifically.
One of the first things you may notice is the FreeBSD kernel warning about ZFS not having enough memory to enable prefetch. That’s OK for now. It will still work for our purposes at this point.
Snapshot It!
Before we start playing, breaking, and doing relatively destructive things, let’s start with a VM snapshot.
Our First ZFS Command
Finally, we are at a point where we can start learning ZFS. Here is your first command:
Wait, what just happened? Well, that simple command created a new pool (“mypool”) containing our five virtual disks in a large stripe and mounted it.
No, really. Look:
Our Second ZFS Command
Time to clean up. Use this command to delete the pool we just created:
Wrap Up
Here’s what we did:
- Assembled our virtualization tools.
- Created a new VM with a ZFS-enabled OS.
- Created virtual disks for experimentation.
- Started and updated the OS.
- Created a ZFS pool of five disks with a single command and then destroyed it.
Next Time
In a future post, we will use our new playground to run reckless and learn.
[Update January 5, 21:20: Josh Gillam find some grammar issues, which I corrected.]

One response to “Building a ZFS Playground”
[…] should review the previous article “Building a ZFS Playground” for details on creating a virtual playground to “play” with ZFS. With this […]
LikeLike